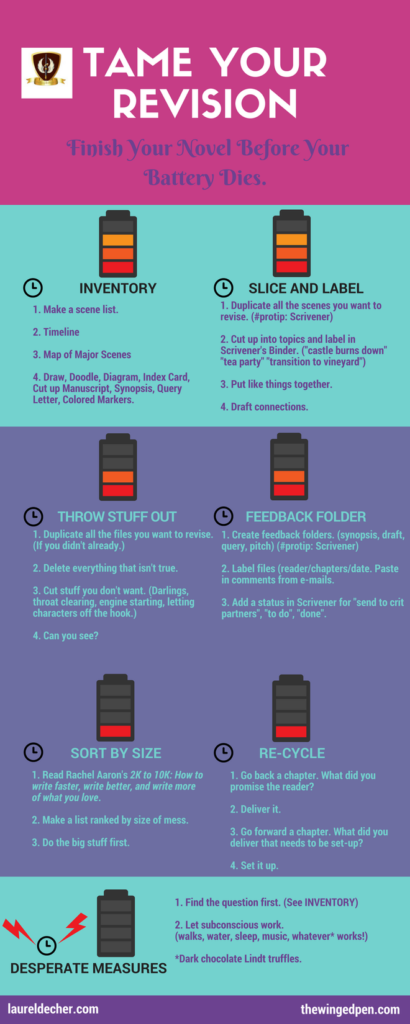
Revising a novel is a form of bookkeeping. How do you keep from losing your mind?
This TAME YOUR REVISION series started over at The Winged Pen.
Here are links to the individual posts:
- Inventory
- Slice and Label With Scrivener
- Throw Stuff Out–There’s no separate post for this one. Everything I have to say is on the infographic. 🙂
- Feedback Folder
- Sort By Size
- Re-Cycle
- Desperate Measures
You can download the infographic.
At The Winged Pen, we’re talking Revision.
To go along with the Winged Pen’s post, I’m attempting a “how-to” series. Let me know how you like it.
If you find yourself in a revision rut, may this jog your creative process back onto the smooth road.
If you’re not a Scrivener person, feel free to adapt to your tool of choice. There’s more than one way to slice and dice a manuscript! 🙂
Save
Save
Save
Save
Save
Save
Save
Save
Save
Save
Save
Save
Save
Save
Save
Save
Save
Here's how I SLICE AND LABEL in Scrivener:
1. Make a Quick Copy
Pick a scene or chapter and make a copy:
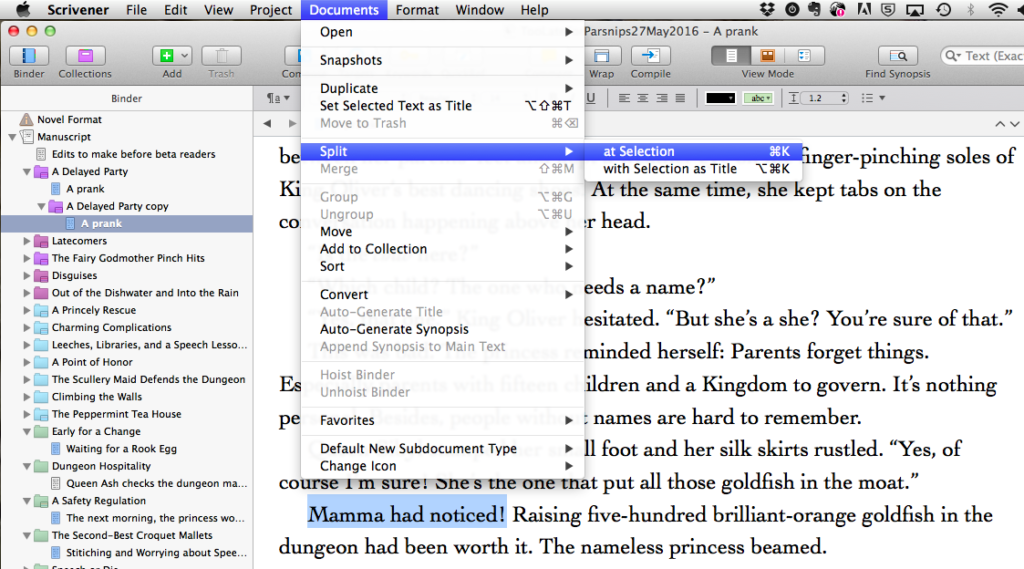
Select the chapter(s) or scene(s) I want to revise today. In the screenshot below, I’ve selected the chapter “A Delayed Party.”
Duplicate the chapter folder including the scenes inside the folder and give it a new name. Scrivener just adds the word “copy” to the end of the name.

2. Read and Label
Do a re-through and see what’s happening. For example, “Conversation about goldfish.” Or “Transition to Castle.” I don’t make a judgement about whether its worthy to stay in the story. Just label and move on.
In the screenshot below, I’ve highlighted “Mamma had noticed!” as the beginning of a conversation about goldfish. Scrivener offers me the choice of “at Selection” or “with Selection as Title.”

I choose “with Selection as title” and Scrivener creates a new text with the title “Mamma had noticed!” I can click on the label and change it to Conversation about goldfish if I want.
3. Put Like With Like
Put like things together. Write new connections. Once all the pieces are labeled, it’s easy to see where you’ve covered the same thing twice. I lift out the pieces I want, leaving the throat-clearings and engine-startings behind. Add transitions if needed
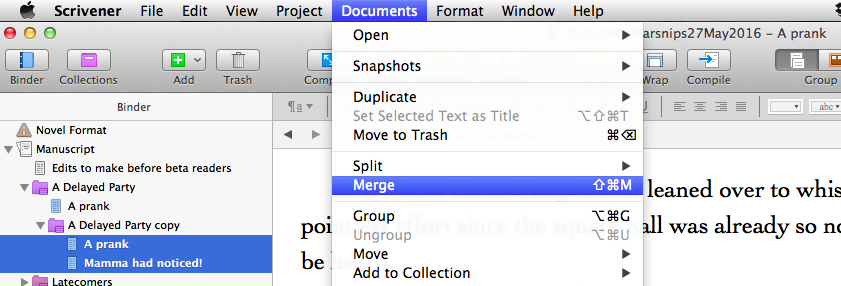
4. Merge Everything Together
Merge everything together. Scrivener will put “A prank” and “Mamma had noticed!” together and label them “A prank.” You can change that after the merge by clicking on the name and typing over it.

Presto! A Nice Tight Scene!
Presto! A nice tight scene with all the ingredients you need to move your story forward.
