
This TAME YOUR REVISION series started over at The Winged Pen.
Here are links to the individual posts:
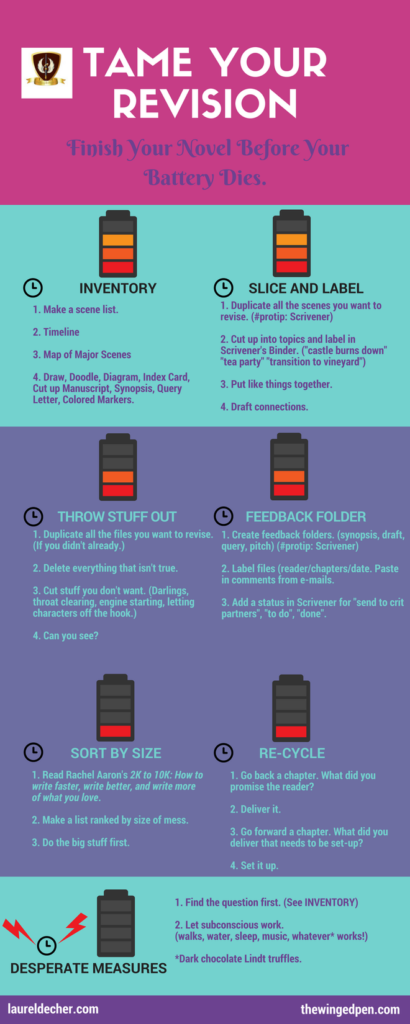
- Inventory
- Slice and Label With Scrivener
- Throw Stuff Out–There’s no separate post for this one. Everything I have to say is on the infographic. 🙂
- Feedback Folder
- Sort By Size
- Re-Cycle
- Desperate Measures
You can download the infographic.
Feel free to share your best revision strategies! I’d love to know how you manage.
Save
Save
Save
Save
Save
Save
Save
Save
Save
Save
Save
Save
Save
Save
Save
Save
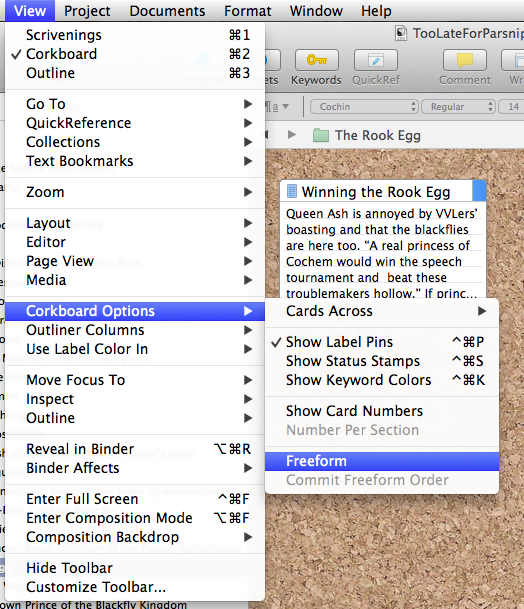
1. Scene List
See what you’ve got already. Or what has to happen to get to the story’s next big scene. Scrivener has a Freeform option that lets you move virtual Index Cards around until you find the order you like. If you choose the Or you can write it out long-hand to get away from the screen.
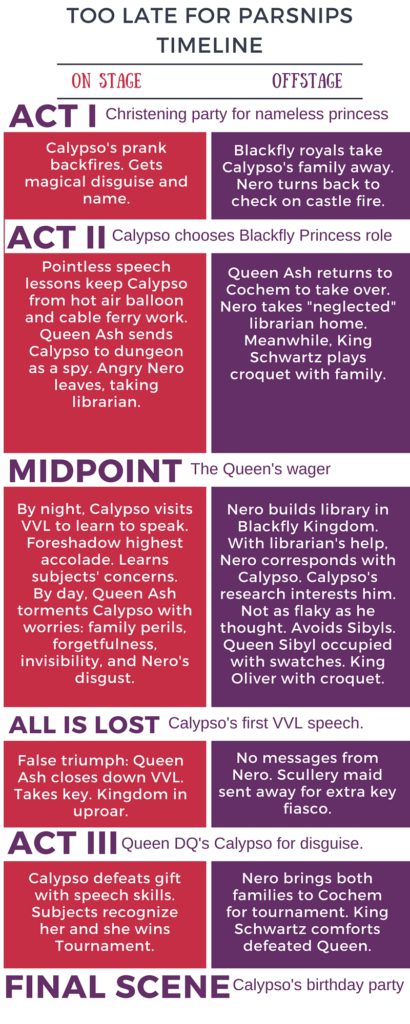
2. Timeline
Set down limits and the “bones” of the story.
This timeline is for my work-in-progress. Note: Contains both spoilers and things that aren’t true any more. And no, I’m not telling you which is which. 😉
Canva is a free online graphics program.
Depending on your personality type, it can be either a defense against the overcomplication gene or a rabbit hole. Make wise choices. 😉
To make something like this, sign up for a free Canva account, click on the green “Create a design” button and choose “Blog Graphic.” Name it something meaningful (you can click on the name to change it later.) Scroll down through the layouts to see what works for your story. I picked a free layout titled “Fiction versus Non-Fiction.” (You’ll recognize the Tame Your Revision layout too.) Use the simple editing tools to modify the layout.
3. Map the Major Scenes
Make a picture. Sometimes you can’t write the scene because you can’t visualize the setting. Try this exercise from Angela Ackerman and Becca Puglisi. Check out these writing maps or make one of your own for first drafts. If you’re further into your story, you might be inspired by these beautiful fictional maps. Or create a map of your own story world with Inkarnate, a free (or paid) tool that is complicated and inviting.
4. Colored Markers or Pencils
Color for sorting: The non-computer methods work when nothing else will. Print it out, cut it up, and label each chunk with a sticky. Try the color-coding thing for each character to keep track of who’s where or what the dialogue’s doing.
The Goal: Keep Your Inner Critic Busy! Let the Story Escape!
Feel free to share your best revision strategies! I’d love to know how you manage.
The goal: Keep your inner critic busy. Let the story escape.
Happy Revising!
Got any good revision tips? Share them–save a writer’s sanity.
Here are the links to the individual posts again:
- Inventory
- Slice and Label With Scrivener
- Throw Stuff Out–There’s no separate post for this one. Everything I have to say is on the infographic. 🙂
- Feedback Folder
- Sort By Size
- Re-Cycle
- Desperate Measures
You can download the infographic.
Save
Save
Save
Save
Save
Save
Save
Save
Save
Save
Save
Save
Save
Save
Save
Save